# 学习资料
# 为什么使用组合式 API?
# 目前,在使用 Vue 2 时可能遇到三个限制
- 代码的可读性问题: 当组件变得越来越大时,可读性变得越来越困难。
- 逻辑复用的问题: 相同的代码逻辑很难在多个组件中进行复用
- TS 相关问题: 对 TypeScript 的支持并不友好
option API和composition API变化与对比

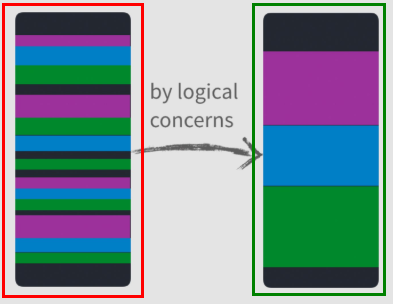
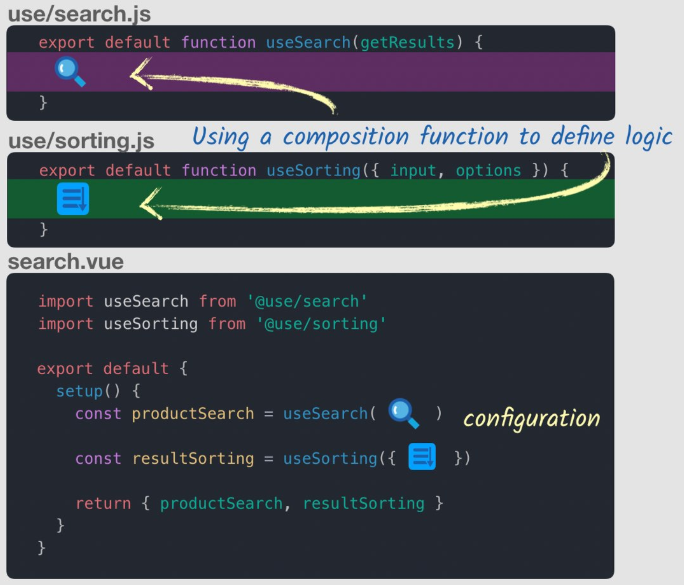
提取到一个独立的组合式函数
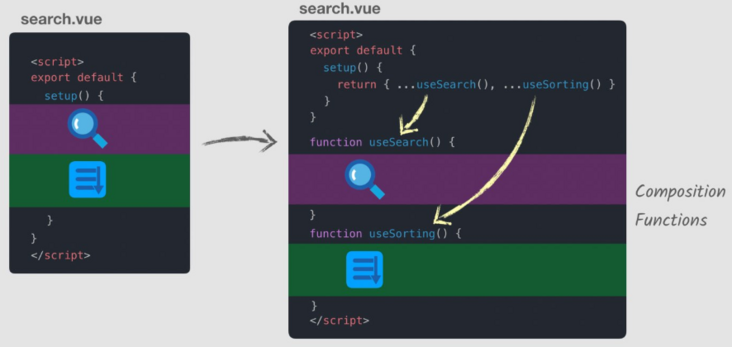
Vue 3 的 composition API 为我们提供了组织复用代码方案
# 组合式 API 基础
# 带 ref 的响应式变量
import { ref } from "vue";

const counter = ref(0);

console.log(counter); // { value: 0 }
console.log(counter.value); // 0

counter.value++;
console.log(counter.value); // 1
2
3
4
5
6
7
8
9
# 生命周期钩子注册在 setup 内部
| 选项式 API | Hook insidesetup |
|---|---|
beforeCreate | setup() |
created | setup() |
beforeMount | onBeforeMount |
mounted | onMounted |
beforeUpdate | onBeforeUpdate |
updated | onUpdated |
beforeDestroy | onBeforeUnmount |
destroyed | onUnmounted |
activated | onActivated |
deactivated | onDeactivated |
errorCaptured | onErrorCaptured |
renderTracked | onRenderTracked |
renderTriggered | onRenderTriggered |
这些函数接受一个回调,当钩子被组件调用时,该回调将被执行。
让我们将其添加到 setup 函数中:
export default {
  setup() {
    // mounted
    onMounted(() => {
      console.log("Component is mounted!");
    });
  },
};
2
3
4
5
6
7
8
# watch 响应式更改
它接受 3 个参数:
- 一个我们想要侦听的响应式引用或 getter 函数
- 一个回调
- 可选的配置选项
import { ref, watch } from "vue";

const counter = ref(0);
watch(counter, (newValue, oldValue) => {
  console.log("The new counter value is: " + counter.value);
});
2
3
4
5
6
# 独立的 computed 属性
import { ref, computed } from "vue";

const counter = ref(0);
const twiceTheCounter = computed(() => counter.value * 2);

counter.value++;
console.log(counter.value); // 1
console.log(twiceTheCounter.value); // 2
2
3
4
5
6
7
8
在这里,我们为computed函数传递了它的第一个参数,它是一个 getter 类回调函数,输出的是一个只读的响应式引用。为了访问新创建的计算变量的 value,我们需要像使用ref一样使用.valueproperty。
# setup 组件选项
为了开始使用组合式 API,我们首先需要一个可以实际使用它的地方。在 Vue 组件中,我们将此位置称为 setup。
使用 setup 函数时,它将接受两个参数:
- props
- context
# Props
export default {
  props: {
    title: String,
  },
  setup(props) {
    console.log(props.title);
  },
};
2
3
4
5
6
7
8
WARNING
但是,因为 props 是响应式的,你不能使用 ES6 解构,因为它会消除 prop 的响应性。
如果需要解构 prop,可以通过使用 setup 函数中的 toRefs 来完成此操作:
import { toRefs } from 'vue'

setup(props) {
  const { title } = toRefs(props)

  console.log(title.value)
}
2
3
4
5
6
7
如果 title 是可选的 prop,则传入的 props 中可能没有 title 。在这种情况下,toRefs 将不会为 title 创建一个 ref 。你需要使用 toRef 替代它:
// MyBook.vue
import { toRef } from 'vue'
setup(props) {
  const title = toRef(props, 'title')
  console.log(title.value)
}
2
3
4
5
6
# Context
export default {
  setup(props, context) {
    // Attribute (非响应式对象)
    console.log(context.attrs);

    // 插槽 (非响应式对象)
    console.log(context.slots);

    // 触发事件 (方法)
    console.log(context.emit);
  },
};
2
3
4
5
6
7
8
9
10
11
12
context 是一个普通的 JavaScript 对象,也就是说,它不是响应式的,这意味着你可以安全地对 context 使用 ES6 解构。
export default {
  setup(props, { attrs, slots, emit }) {
    ...
  }
}
2
3
4
5
TIP
与 props 不同,attrs 和 slots 是非响应式的。如果你打算根据 attrs 或 slots 更改应用副作用,那么应该在 onUpdated 生命周期钩子中执行此操作。
# 访问组件的 property
执行 setup 时,组件实例尚未被创建。因此,你只能访问以下 property:
- props
- attrs
- slots
- emit
换句话说,你将无法访问以下组件选项:
- data
- computed
- methods
# 响应性基础
# 声明响应式状态
一般 reactive 创建对象创建响应式状态,ref 更推荐定义基本类型 要为 JavaScript 对象创建响应式状态,可以使用 reactive 方法:
import { reactive } from "vue";

// 响应式状态
const state = reactive({
  count: 0,
});
2
3
4
5
6
# 创建独立的响应式值作为 refs
import { ref } from "vue";

const count = ref(0);
//   ref(0) -> reactive({value: 0})
console.log(count.value); // 0

count.value++;
console.log(count.value); // 1
2
3
4
5
6
7
8
# 访问响应式对象
const count = ref(0);
const state = reactive({
  count,
});

console.log(state.count); // 0

state.count = 1;
console.log(count.value); // 1
2
3
4
5
6
7
8
9
如果将新的 ref 赋值给现有 ref 的 property,将会替换旧的 ref:
const otherCount = ref(2);

state.count = otherCount;
console.log(state.count); // 2
console.log(count.value); // 1
2
3
4
5
Ref 展开仅发生在被响应式 Object 嵌套的时候。当从 Array 或原生集合类型如 Map 访问 ref 时,不会进行展开:
const books = reactive([ref("Vue 3 Guide")]);
// 这里需要 .value
console.log(books[0].value);

const map = reactive(new Map([["count", ref(0)]]));
// 这里需要 .value
console.log(map.get("count").value);
2
3
4
5
6
7
# 响应式状态解构
import { reactive, toRefs } from "vue";

const book = reactive({
  author: "Vue Team",
  year: "2020",
  title: "Vue 3 Guide",
  description: "You are reading this book right now ;)",
  price: "free",
});

let { author, title } = toRefs(book);

title.value = "Vue 3 Detailed Guide"; // 我们需要使用 .value 作为标题,现在是 ref
console.log(book.title); // 'Vue 3 Detailed Guide'
2
3
4
5
6
7
8
9
10
11
12
13
14
# 使用 readonly 防止更改响应式对象
import { reactive, readonly } from "vue";

const original = reactive({ count: 0 });

const copy = readonly(original);

// 通过 original 修改 count,将会触发依赖 copy 的侦听器

original.count++;

// 通过 copy 修改 count,将导致失败并出现警告
copy.count++; // 警告: "Set operation on key 'count' failed: target is readonly."
2
3
4
5
6
7
8
9
10
11
12
# 响应式计算和侦听
# 计算值
有时我们需要依赖于其他状态的状态——在 Vue 中,这是用组件计算属性处理的,以直接创建计算值,我们可以使用computed方法:它接受 getter 函数并为 getter 返回的值返回一个不可变的响应式 ref 对象。
const count = ref(1);
const plusOne = computed(() => count.value + 1);

console.log(plusOne.value); // 2

plusOne.value++; // error
2
3
4
5
6
或者,它可以使用一个带有 get 和 set 函数的对象来创建一个可写的 ref 对象。
const count = ref(1);
const plusOne = computed({
  get: () => count.value + 1,
  set: (val) => {
    count.value = val - 1;
  },
});

plusOne.value = 1;
console.log(count.value); // 0
2
3
4
5
6
7
8
9
10
# watchEffect
为了根据响应式状态自动应用和重新应用副作用,我们可以使用watchEffect方法。它立即执行传入的一个函数,同时响应式追踪其依赖,并在其依赖变更时重新运行该函数。
const count = ref(0);

watchEffect(() => console.log(count.value));
// -> logs 0

setTimeout(() => {
  count.value++;
  // -> logs 1
}, 100);
2
3
4
5
6
7
8
9
# 停止侦听
当 watchEffect 在组件的setup()函数或生命周期钩子被调用时,侦听器会被链接到该组件的生命周期,并在组件卸载时自动停止。
在一些情况下,也可以显式调用返回值以停止侦听:
const stop = watchEffect(() => {
  /* ... */
});

// later
stop();
2
3
4
5
6
# 清除副作用
有时副作用函数会执行一些异步的副作用,这些响应需要在其失效时清除 (即完成之前状态已改变了) 。所以侦听副作用传入的函数可以接收一个onInvalidate函数作入参,用来注册清理失效时的回调。当以下情况发生时,这个失效回调会被触发:
- 副作用即将重新执行时
- 侦听器被停止 (如果在 setup() 或生命周期钩子函数中使用了 watchEffect,则在组件卸载时)
在执行数据请求时,副作用函数往往是一个异步函数:
const data = ref(null);
watchEffect(async (onInvalidate) => {
  onInvalidate(() => {
    /* ... */
  }); // 我们在Promise解析之前注册清除函数
  data.value = await fetchData(props.id);
});
2
3
4
5
6
7
# 副作用刷新时机
Vue 的响应性系统会缓存副作用函数,并异步地刷新它们,这样可以避免同一个“tick” 中多个状态改变导致的不必要的重复调用。在核心的具体实现中,组件的update函数也是一个被侦听的副作用。当一个用户定义的副作用函数进入队列时,默认情况下,会在所有的组件update前执行:
<template>
  <div>{{ count }}</div>
</template>

<script>
  export default {
    setup() {
      const count = ref(0)

      watchEffect(() => {
        console.log(count.value)
      })

      return {
        count
      }
    }
  }
</script>
2
3
4
5
6
7
8
9
10
11
12
13
14
15
16
17
18
19
在这个例子中:
- count 会在初始运行时同步打印出来
- 更改 count 时,将在组件更新前执行副作用。
如果需要在组件更新(例如:当与模板引用一起)后重新运行侦听器副作用,我们可以传递带有flush选项的附加options对象 (默认为'pre'):
// 在组件更新后触发,这样你就可以访问更新的 DOM。
// 注意:这也将推迟副作用的初始运行,直到组件的首次渲染完成。
watchEffect(
  () => {
    /* ... */
  },
  {
    flush: "post",
  }
);
2
3
4
5
6
7
8
9
10
flush选项还接受sync,这将强制效果始终同步触发。然而,这是低效的,应该很少需要。
# 侦听器调试
onTrack和onTrigger选项可用于调试侦听器的行为。
onTrack将在响应式property或ref作为依赖项被追踪时被调用。onTrigger将在依赖项变更导致副作用被触发时被调用。
这两个回调都将接收到一个包含有关所依赖项信息的调试器事件。建议在以下回调中编写debugger语句来检查依赖关系:
watchEffect(
  () => {
    /* 副作用 */
  },
  {
    onTrigger(e) {
      debugger;
    },
  }
);
2
3
4
5
6
7
8
9
10
onTrack和onTrigger只能在开发模式下工作。
# watch 侦听单个数据源
侦听器数据源可以是返回值的getter函数,也可以直接是ref:
// 侦听一个 getter
const state = reactive({ count: 0 });
watch(
  () => state.count,
  (count, prevCount) => {
    /* ... */
  }
);

// 直接侦听ref
const count = ref(0);
watch(count, (count, prevCount) => {
  /* ... */
});
2
3
4
5
6
7
8
9
10
11
12
13
14
# 侦听多个数据源
const firstName = ref("");
const lastName = ref("");

watch([firstName, lastName], (newValues, prevValues) => {
  console.log(newValues, prevValues);
});

firstName.value = "John"; // logs: ["John",""] ["", ""]
lastName.value = "Smith"; // logs: ["John", "Smith"] ["John", ""]
2
3
4
5
6
7
8
9
# 侦听响应式对象
const numbers = reactive([1, 2, 3, 4]);

watch(
  () => [...numbers],
  (numbers, prevNumbers) => {
    console.log(numbers, prevNumbers);
  }
);

numbers.push(5); // logs: [1,2,3,4,5] [1,2,3,4]
2
3
4
5
6
7
8
9
10
尝试检查深度嵌套对象或数组中的 property 变化时,仍然需要 deep 选项设置为 true。
const state = reactive({
  id: 1,
  attributes: {
    name: "",
  },
});

watch(
  () => state,
  (state, prevState) => {
    console.log("not deep ", state.attributes.name, prevState.attributes.name);
  }
);

watch(
  () => state,
  (state, prevState) => {
    console.log("deep ", state.attributes.name, prevState.attributes.name);
  },
  { deep: true }
);

state.attributes.name = "Alex"; // 日志: "deep " "Alex" "Alex"
2
3
4
5
6
7
8
9
10
11
12
13
14
15
16
17
18
19
20
21
22
23
然而,侦听一个响应式对象或数组将始终返回该对象的当前值和上一个状态值的引用。为了完全侦听深度嵌套的对象和数组,可能需要对值进行深拷贝。这可以通过诸如lodash.cloneDeep这样的实用工具来实现。
import _ from "lodash";

const state = reactive({
  id: 1,
  attributes: {
    name: "",
  },
});

watch(
  () => _.cloneDeep(state),
  (state, prevState) => {
    console.log(state.attributes.name, prevState.attributes.name);
  }
);

state.attributes.name = "Alex"; // 日志: "Alex" ""
2
3
4
5
6
7
8
9
10
11
12
13
14
15
16
17
# 与watchEffect共享的行为
watch与watchEffect共享停止侦听,清除副作用 (相应地onInvalidate会作为回调的第三个参数传入)、副作用刷新时机和侦听器调试行为。
# Vue 2 中的更改检测警告
# 对于对象
Vue 无法检测到 property 的添加或删除。由于 Vue 在实例初始化期间执行 getter/setter 转换过程,因此必须在data对象中存在一个 property,以便 Vue 对其进行转换并使其具有响应式。例如:
var vm = new Vue({
  data: {
    a: 1,
  },
});
// `vm.a` 现在是响应式的

vm.b = 2;
// `vm.b` 不是响应式的
2
3
4
5
6
7
8
9
对于已经创建的实例,Vue 不允许动态添加根级别的响应式 property。但是,可以使用Vue.set(object, propertyName, value)方法向嵌套对象添加响应式 property:
Vue.set(vm.someObject, "b", 2);
你还可以使用vm.$set实例方法,这也是全局Vue.set方法的别名:
this.$set(this.someObject, "b", 2);
有时你可能需要为已有对象赋值多个新 property,比如使用Object.assign()或_.extend()。但是,这样添加到对象上的新property不会触发更新。在这种情况下,你应该用原对象与要混合进去的对象的property一起创建一个新的对象。
// 而不是 `Object.assign(this.someObject, { a: 1, b: 2 })`
this.someObject = Object.assign({}, this.someObject, { a: 1, b: 2 });
2
# 对于数组
Vue 不能检测以下数组的变动:
- 当你利用索引直接设置一个数组项时,例如:
vm.items[indexOfItem] = newValue - 当你修改数组的长度时,例如:
vm.items.length = newLength例如:
var vm = new Vue({
  data: {
    items: ["a", "b", "c"],
  },
});
vm.items[1] = "x"; // 不是响应式的
vm.items.length = 2; // 不是响应式的
2
3
4
5
6
7
为了解决第一种问题,以下两种方式都可以实现和vm.items[indexOfItem] = newValue相同的效果,同时也会触发响应性系统的状态更新:
// Vue.set
Vue.set(vm.items, indexOfItem, newValue);
2
vm.items.splice(indexOfItem, 1, newValue);
你也可以使用vm.$set实例方法,该方法是全局方法Vue.set的一个别名:
vm.$set(vm.items, indexOfItem, newValue);
为了解决第二种问题,你可以使用splice:
vm.items.splice(newLength);
# 异步更新队列
可能你还没有注意到,Vue 在更新 DOM 时是异步执行的。只要侦听到数据变化,Vue 将开启一个队列,并缓冲在同一事件循环中发生的所有数据变更。如果同一个侦听器被多次触发,它只会被推入到队列中一次。这种在缓冲时去除重复数据对于避免不必要的计算和 DOM 操作是非常重要的。然后,在下一个的事件循环“tick”中,Vue 刷新队列并执行实际 (已去重的) 工作。Vue 在内部对异步队列尝试使用原生的Promise.then、MutationObserver和setImmediate,如果执行环境不支持,则会采用setTimeout(fn, 0)代替。
例如,当你设置vm.someData = 'new value',该组件不会立即重新渲染。当刷新队列时,组件会在下一个事件循环“tick”中更新。多数情况我们不需要关心这个过程,但是如果你想基于更新后的 DOM 状态来做点什么,这就可能会有些棘手。虽然 Vue.js 通常鼓励开发人员使用“数据驱动”的方式思考,避免直接操作 DOM,但是有时我们必须要这么做。为了在数据变化之后等待 Vue 完成更新 DOM,可以在数据变化之后立即使用 Vue.nextTick(callback)。这样回调函数将在 DOM 更新完成后被调用。例如:
<div id="example">{{ message }}</div>
var vm = new Vue({
  el: "#example",
  data: {
    message: "123",
  },
});
vm.message = "new message"; // 更改数据
vm.$el.textContent === "new message"; // false
Vue.nextTick(function() {
  vm.$el.textContent === "new message"; // true
});
2
3
4
5
6
7
8
9
10
11
在组件内使用vm.$nextTick()实例方法特别方便,因为它不需要全局Vue,并且回调函数中的this将自动绑定到当前的组件实例上:
Vue.component("example", {
  template: "<span>{{ message }}</span>",
  data: function() {
    return {
      message: "not updated",
    };
  },
  methods: {
    updateMessage: function() {
      this.message = "updated";
      console.log(this.$el.textContent); // => 'not updated'
      this.$nextTick(function() {
        console.log(this.$el.textContent); // => 'updated'
      });
    },
  },
});
2
3
4
5
6
7
8
9
10
11
12
13
14
15
16
17
因为$nextTick()返回一个 Promise 对象,所以你可以使用新的 ES2017 async/await 语法完成相同的事情:
 methods: {
    updateMessage: async function () {
      this.message = 'updated'
      console.log(this.$el.textContent) // => 'not updated'
      await this.$nextTick()
      console.log(this.$el.textContent) // => 'updated'
    }
  }
2
3
4
5
6
7
8
# 自定义指令
示例
import { createApp } from "vue";
const app = createApp({});

// 注册
app.directive("my-directive", {
  // 指令是具有一组生命周期的钩子:
  // 在绑定元素的 attribute 或事件监听器被应用之前调用
  created() {},
  // 在绑定元素的父组件挂载之前调用
  beforeMount() {},
  // 绑定元素的父组件被挂载时调用
  mounted() {},
  // 在包含组件的 VNode 更新之前调用
  beforeUpdate() {},
  // 在包含组件的 VNode 及其子组件的 VNode 更新之后调用
  updated() {},
  // 在绑定元素的父组件卸载之前调用
  beforeUnmount() {},
  // 卸载绑定元素的父组件时调用
  unmounted() {},
});

// 注册 (功能指令)
app.directive("my-directive", () => {
  // 这将被作为 `mounted` 和 `updated` 调用
});

// getter, 如果已注册,则返回指令定义
const myDirective = app.directive("my-directive");
2
3
4
5
6
7
8
9
10
11
12
13
14
15
16
17
18
19
20
21
22
23
24
25
26
27
28
29
全局注册
import { createApp } from "vue";
import App from "./App.vue";

const app = createApp(App);
// 注册一个全局自定义指令 `v-focus`
app.directive("focus", {
  // 当被绑定的元素挂载到 DOM 中时……
  mounted(el) {
    // 聚焦元素
    el.focus();
  },
});

app.directive("highlight", {
  beforeMount(el, binding, vnode) {
    el.style.background = binding.value;
  },
});

app.directive("pin", {
  mounted(el, binding) {
    el.style.position = "fixed";
    // binding.arg 是我们传递给指令的参数
    const s = binding.arg || "top";
    el.style[s] = binding.value + "px";
  },
  updated(el, binding, vnode, oldVnode) {
    el.style.cssText = ""; //清空原有样式
    el.style.position = "fixed";
    // binding.arg 是我们传递给指令的参数
    const s = binding.arg || "top";
    el.style[s] = binding.value + "px";
  },
});

app.mount("#app");
2
3
4
5
6
7
8
9
10
11
12
13
14
15
16
17
18
19
20
21
22
23
24
25
26
27
28
29
30
31
32
33
34
35
36
<template>
  <div>
    <input v-focus type="text" />
    <p v-highlight="'yellow'">Highlight this text bright yellow</p>
    <p v-pin:[direction]="200">
      I am pinned onto the page at 200px to the right.
    </p>
    <button @click="changeDirection('left')">direction变成left</button>
  </div>
</template>

<script>
  import { ref } from "vue";
  export default {
    setup(props) {
      const direction = ref("right");
      function changeDirection(val) {
        direction.value = val;
      }
      return {
        direction,
        changeDirection,
      };
    },
  };
</script>
2
3
4
5
6
7
8
9
10
11
12
13
14
15
16
17
18
19
20
21
22
23
24
25
26
组件局部注册
directives: {
  focus: {
    // 指令的定义
    mounted(el) {
      el.focus()
    }
  }
}
2
3
4
5
6
7
8
自定义指令的应用
vue-element-admin 框架的指令权限,就是通过封装了一个自定义指令权限 v-permission
<template>
  <!-- Admin can see this -->
  <el-tag v-permission="['admin']">admin</el-tag>

  <!-- Editor can see this -->
  <el-tag v-permission="['editor']">editor</el-tag>

  <!-- Editor can see this -->
  <el-tag v-permission="['admin','editor']"
    >Both admin or editor can see this</el-tag
  >
</template>

<script>
  // 当然你也可以为了方便使用,将它注册到全局
  import permission from "@/directive/permission/index.js"; // 权限判断指令
  export default {
    directives: { permission },
  };
</script>
2
3
4
5
6
7
8
9
10
11
12
13
14
15
16
17
18
19
20
import store from "@/store";

function checkPermission(el, binding) {
  const { value } = binding;
  const roles = store.getters && store.getters.roles; // ['admin','role1','role2']

  if (value && value instanceof Array) {
    if (value.length > 0) {
      const permissionRoles = value; //['admin','editor']

      ///检查permissionRoles是否包含roles中某一个
      const hasPermission = roles.some((role) => {
        return permissionRoles.includes(role);
      });
      // 如果没有,移除该DOM元素(找到父级元素/父节点,删除当前DOM)
      if (!hasPermission) {
        el.parentNode && el.parentNode.removeChild(el);
      }
    }
  } else {
    throw new Error(`need roles! Like v-permission="['admin','editor']"`);
  }
}

export default {
  inserted(el, binding) {
    checkPermission(el, binding);
  },
  update(el, binding) {
    checkPermission(el, binding);
  },
};
2
3
4
5
6
7
8
9
10
11
12
13
14
15
16
17
18
19
20
21
22
23
24
25
26
27
28
29
30
31
32
# Provide / Inject
provide 函数允许你通过两个参数定义 property:
- property 的 name(
String类型) - property 的 value
<!-- src/components/MyMap.vue -->
<template>
  <MyMarker />
</template>

<script>
  import { provide } from 'vue'
  import MyMarker from './MyMarker.vue

  export default {
    components: {
      MyMarker
    },
    setup() {
      provide('location', 'North Pole')
      provide('geolocation', {
        longitude: 90,
        latitude: 135
      })
    }
  }
</script>
2
3
4
5
6
7
8
9
10
11
12
13
14
15
16
17
18
19
20
21
22
添加响应性
为了增加 provide 值和 inject 值之间的响应性,我们可以在 provide 值时使用 ref 或 reactive。
有时我们需要在注入数据的组件内部更新 inject 的数据。在这种情况下,我们建议 provide 一个方法来负责改变响应式 property。
如果要确保通过 provide 传递的数据不会被 inject 的组件更改,我们建议对提供者的 property 使用 readonly。
<!-- src/components/MyMap.vue -->
<template>
  <MyMarker />
</template>

<script>
  import { provide, reactive, readonly, ref } from 'vue'
  import MyMarker from './MyMarker.vue

  export default {
    components: {
      MyMarker
    },
    setup() {
      const location = ref('North Pole')
      const geolocation = reactive({
        longitude: 90,
        latitude: 135
      })

      const updateLocation = (val) => {
        location.value = val || 'South Pole'
      }

      provide('location', readonly(location))
      provide('geolocation', readonly(geolocation))
      provide('updateLocation', updateLocation)
    }
  }
</script>
2
3
4
5
6
7
8
9
10
11
12
13
14
15
16
17
18
19
20
21
22
23
24
25
26
27
28
29
30
<!-- src/components/MyMarker.vue -->
<script>
  import { inject } from "vue";

  export default {
    setup() {
      const userLocation = inject("location", "The Universe");
      const userGeolocation = inject("geolocation");
      const updateUserLocation = inject("updateLocation");

      return {
        userLocation,
        userGeolocation,
        updateUserLocation,
      };
    },
  };
</script>
2
3
4
5
6
7
8
9
10
11
12
13
14
15
16
17
18
inject 函数有两个参数:
- 要 inject 的 property 的名称
- 一个默认的值 (可选)
<!-- src/components/MyMarker.vue -->
<template>
  <div>
    {{ userLocation }} {{ userGeolocation }}
    <button @click="updateUserLocation('childval')">MyMarker更新</button>
  </div>
</template>
<script>
  import { inject } from "vue";

  export default {
    setup(props, ctx) {
      const userLocation = inject("location", "The Universe");
      const userGeolocation = inject("geolocation");
      const updateUserLocation = inject("updateLocation");
      return {
        userLocation,
        userGeolocation,
        updateUserLocation,
      };
    },
  };
</script>
2
3
4
5
6
7
8
9
10
11
12
13
14
15
16
17
18
19
20
21
22
23
# script setup 语法糖
不需要写 setup(),自动 return。
<script setup>
  // imported components are also directly usable in template
  import Foo from "./Foo.vue";
  import { ref } from "vue";

  // write Composition API code just like in a normal setup()
  // but no need to manually return everything
  const count = ref(0);
  const inc = () => {
    count.value++;
  };
</script>

<template>
  <Foo :count="count" @click="inc" />
</template>
2
3
4
5
6
7
8
9
10
11
12
13
14
15
16